Eliminate Trail Camera Theft with Elevated Setups
As serious hunters and trail cam users, we all know that anxious feeling before a card pull…waiting, hoping, and dreaming about images of that giant we hope to see on the hoof… like kids sleeping Christmas Eve. And then we know the flip side, being that child on Christmas morning sprinting down the stairs to see a barren floor under the tree.
We’ve all been there, experienced that feeling…that feeling that is so painfully close to being punched in the stomach or kicked in the “you know what”! If you’re one of the lucky few who haven’t experienced this frustration, then hats off… but it may only be a matter of time. Public land or private land, it doesn’t seem to matter much, trail camera theft happens all too often and unfortunately, in today’s world, it’s something that should be present on all trail cam users’ minds.
With #VelvetFest under way and folks hitting the woods to deploy their cameras to start summer scouting, we thought it would be a good time to talk theft prevention outside of the conventional practices of security boxes, python cables and other locking mechanisms.
THE ELEVATED SETUP

We spend hours reading maps and scouring Google Earth to find those geographical terrain features that prove to provide habitat for mature deer. And then the miles, donated boot leather pounding the ground all year to find those rub lines, travel routes, scrapes, and bedding that we hope will yield clues to harvest a giant! However, once we find these desirable areas, the majority of us simply strap our camera onto a tree at eye level and walk away until the next card pull. While the camera may not always be easily visible, the straps typically are and we can honestly say there have been countless times when accessing remote setups that we visibly notice the strap before the camera itself. Being public land hunters we can promise you this.... If you were able to find the “spot", someone else has been there prior or will be there in the future.
Plainly put, stop hanging your cams in the “Line of Sight” of people! Just as we conceal our stand locations by simply being elevated out of the LOS of our prey, we should be elevating our trail cameras when worried about theft. People cannot take what they cannot see. It doesn’t take any longer and can provide unique photos and videos for us to view, all with giving us the comfort of knowing our cameras are safer.
WHERE

An elevated set overlooking a mineral site on one of our few private pieces.
While you can deploy an elevated set just about anywhere, we like to focus this strategy on a few locations for different reasons.
- Mineral/Bait Sites/Micro Plots - Anyone walking through the woods, that has any sense, knows when they stumble upon a bait or mineral site there is bound to be a camera keeping tabs. Same goes for all those putting in micro or kill plots and monitoring them with a camera. Getting your cameras in the air serves dual purposes here, decreasing the odds of it walking away and also catching any trespassers that may be hampering deer movement.
- Scrapes - Again, for those venturing around the woods come fall, scrapes are prime destination for cameras and easy pickings for the thieving. Running elevated sets here, again will better the odds of your camera not walking off but also has the advantages of offering unique angles of head gear making for some beautiful photos and videos.
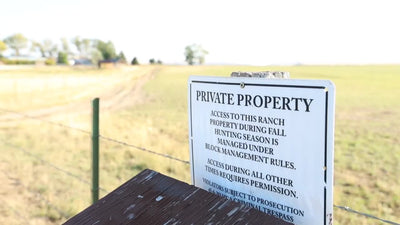
- High Traffic Areas - Being on mostly public, anytime where our sets are easily accessed and have the ability to be elevated we do so. Logging roads, areas unguarded by terrain, ATV trails, bridal trails, hiking trails, and private property lines all fall here. On public ground this will also give you a reference to what kind of pressure the area is experiencing and/or how far fellow hunters are willing to go off the beaten path. This is a tactic we use on the regular to monitor foot traffic in and out of specific areas we have interest in.

A set hung near a property line, intertwined with hiking trails, that made us a little nervous to hang a camera at ground level. This set proved itself all season with photos of hikers and a couple nice bucks to boot.
HOW TO
When finding these points of interest where we wish to gather intel, we like to find trees that are relatively hard to climb, having minimal limbs or splits under 10’. Something similar you would use a climbing stand on. If no suitable trees can be found in proximity of the area you wish to monitor, we typically like to place our cams a little higher and conceal them with a few branches as best as possible. Just be sure the immediate detection zone is free of branches, leaves, etc. that may cause false triggers, no one likes scrolling through thousands of blank photos.

Using a climbing stick we try to hang our trail cameras between 10’-12’ off the ground. We've even seen a few guys who use climbing spikes in place of sticks, but watch out they are a bit tough to use until you get the hang of them. You want your camera aimed slightly downward, not so steep that you drastically reduce the cameras detection zone, just enough to have your target well framed. We accomplish our alignments with the aid of a pivoting 3rd party mounting system but you can certainly make due with just a small stick wedged behind the camera if need be. If we want to be extra cautious, we’ll add a python lock to the setup. It also comes in handy for alignment purposes if the camera model you are using has a viewing screen or aiming device. If your camera has neither, it may take a few attempts to get the field of view you desire, but after a few setups you should become relatively efficient.
GIVE & TAKE

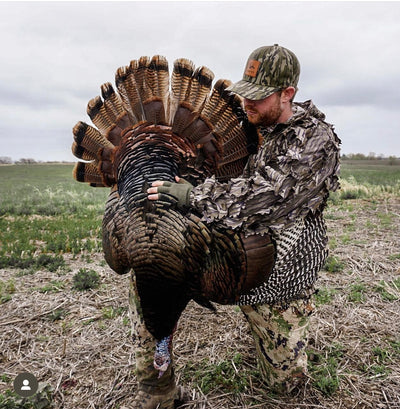
Also note, as in the picture above, it can become more difficult to estimate the age of a buck, especially if there's no previous history with him. Features like belly, neck lines, legs in proportion to his body become less visible because of the downward angles. For us and many others it's simply a trade off, one of value as long as your confident in identifying and rough aging bucks.
While this is a topic for another time that we plan to discuss, an additional advantage to hanging your cameras in the air is that they become significantly less noticeable to deer. We've all had photos of deer staring down our cameras, for one reason or another...In the photo below meet "Tom", our real life example of how a mature deer can pick out a camera and then avoid it. The thought of alerting a buck that he's being hunted because of a camera makes us all uneasy.

After Matt had a couple encounters with "Tom" it was simple to realize he was avoiding our cameras...Only gathering 3 or 4 photos the entire season. "Tom" lives on but we plan to use elevated sets to help kill him this fall.
While nothing is guaranteed, conventional precautions are your best bet to stop a thief...Security boxes, python cables, locks, etc but if those are not suitable an elevated set may be your ticket. Utilizing elevated sets when possible has proven it's effectiveness to the Exodus crew. Running a large number of cameras, 100+, with the vast majority on public ground we've yet to have an elevated camera get stolen. Those are hard numbers to argue.